Bézier Curves in Live Graphics:
The Complete Guide to Easing
How cubic bézier curves control motion, alpha, and scale in broadcast and live streaming graphics — the three curves every operator and streamer needs, and the exact values to use them in CloudMonet.
There is a moment in every live production — broadcast or stream — when a graphic builds onto screen and something feels wrong. The animation is technically correct. The element appears, moves to its target position, stops. But it reads as cheap. As software, not production. Nine times out of ten, the problem is the easing curve.
Easing is the shape of change over time. Not what moves — but how it moves. Not that opacity increases — but at what rate the increase happens. It is the difference between a lower third that lands with authority and one that slides in like a loading bar. Between a breaking news banner that demands attention and one that fades up like a screensaver. Between a stream overlay that feels native and one that feels like an afterthought.
The tool that controls this is the cubic bézier curve. Two control points, each with an X and Y coordinate. Four numbers that determine whether your live graphics feel professional or like an afterthought — on any live production, from a network broadcast to a Twitch stream.
What Is a Cubic Bézier Curve?
A cubic bézier curve maps input time (0 to 1, from animation start to end) to output progress (also 0 to 1, from start value to end value). The shape of this mapping determines how quickly or slowly different parts of the animation progress.
The curve is defined by two control points: P1 and P2. Each has an X coordinate (where in the animation the influence occurs) and a Y coordinate (how much the animation has progressed at that moment). P1 primarily shapes the beginning of the animation; P2 shapes the end.
“Four numbers — P1x, P1y, P2x, P2y — separate live graphics that feel produced from graphics that feel like software.”
— The fundamental rule of easingIn CloudMonet, you set these control points through the Easing panel in the Animate tab. You can choose from named presets — Smooth Land, Slow Start, Smooth, Snap — or select Custom to drag handles directly on the curve canvas and type exact P1/P2 values. The interactive editors in this guide work exactly the same way.
How Easing Works in CloudMonet
Before applying any curve, it helps to understand how CloudMonet's animation system is structured. Animation in CloudMonet is per-property — each transform (X position, Y position, Scale X, Scale Y, Rotation, Alpha) has its own keyframe row in the timeline, and each keyframe pair can have an independent easing curve.
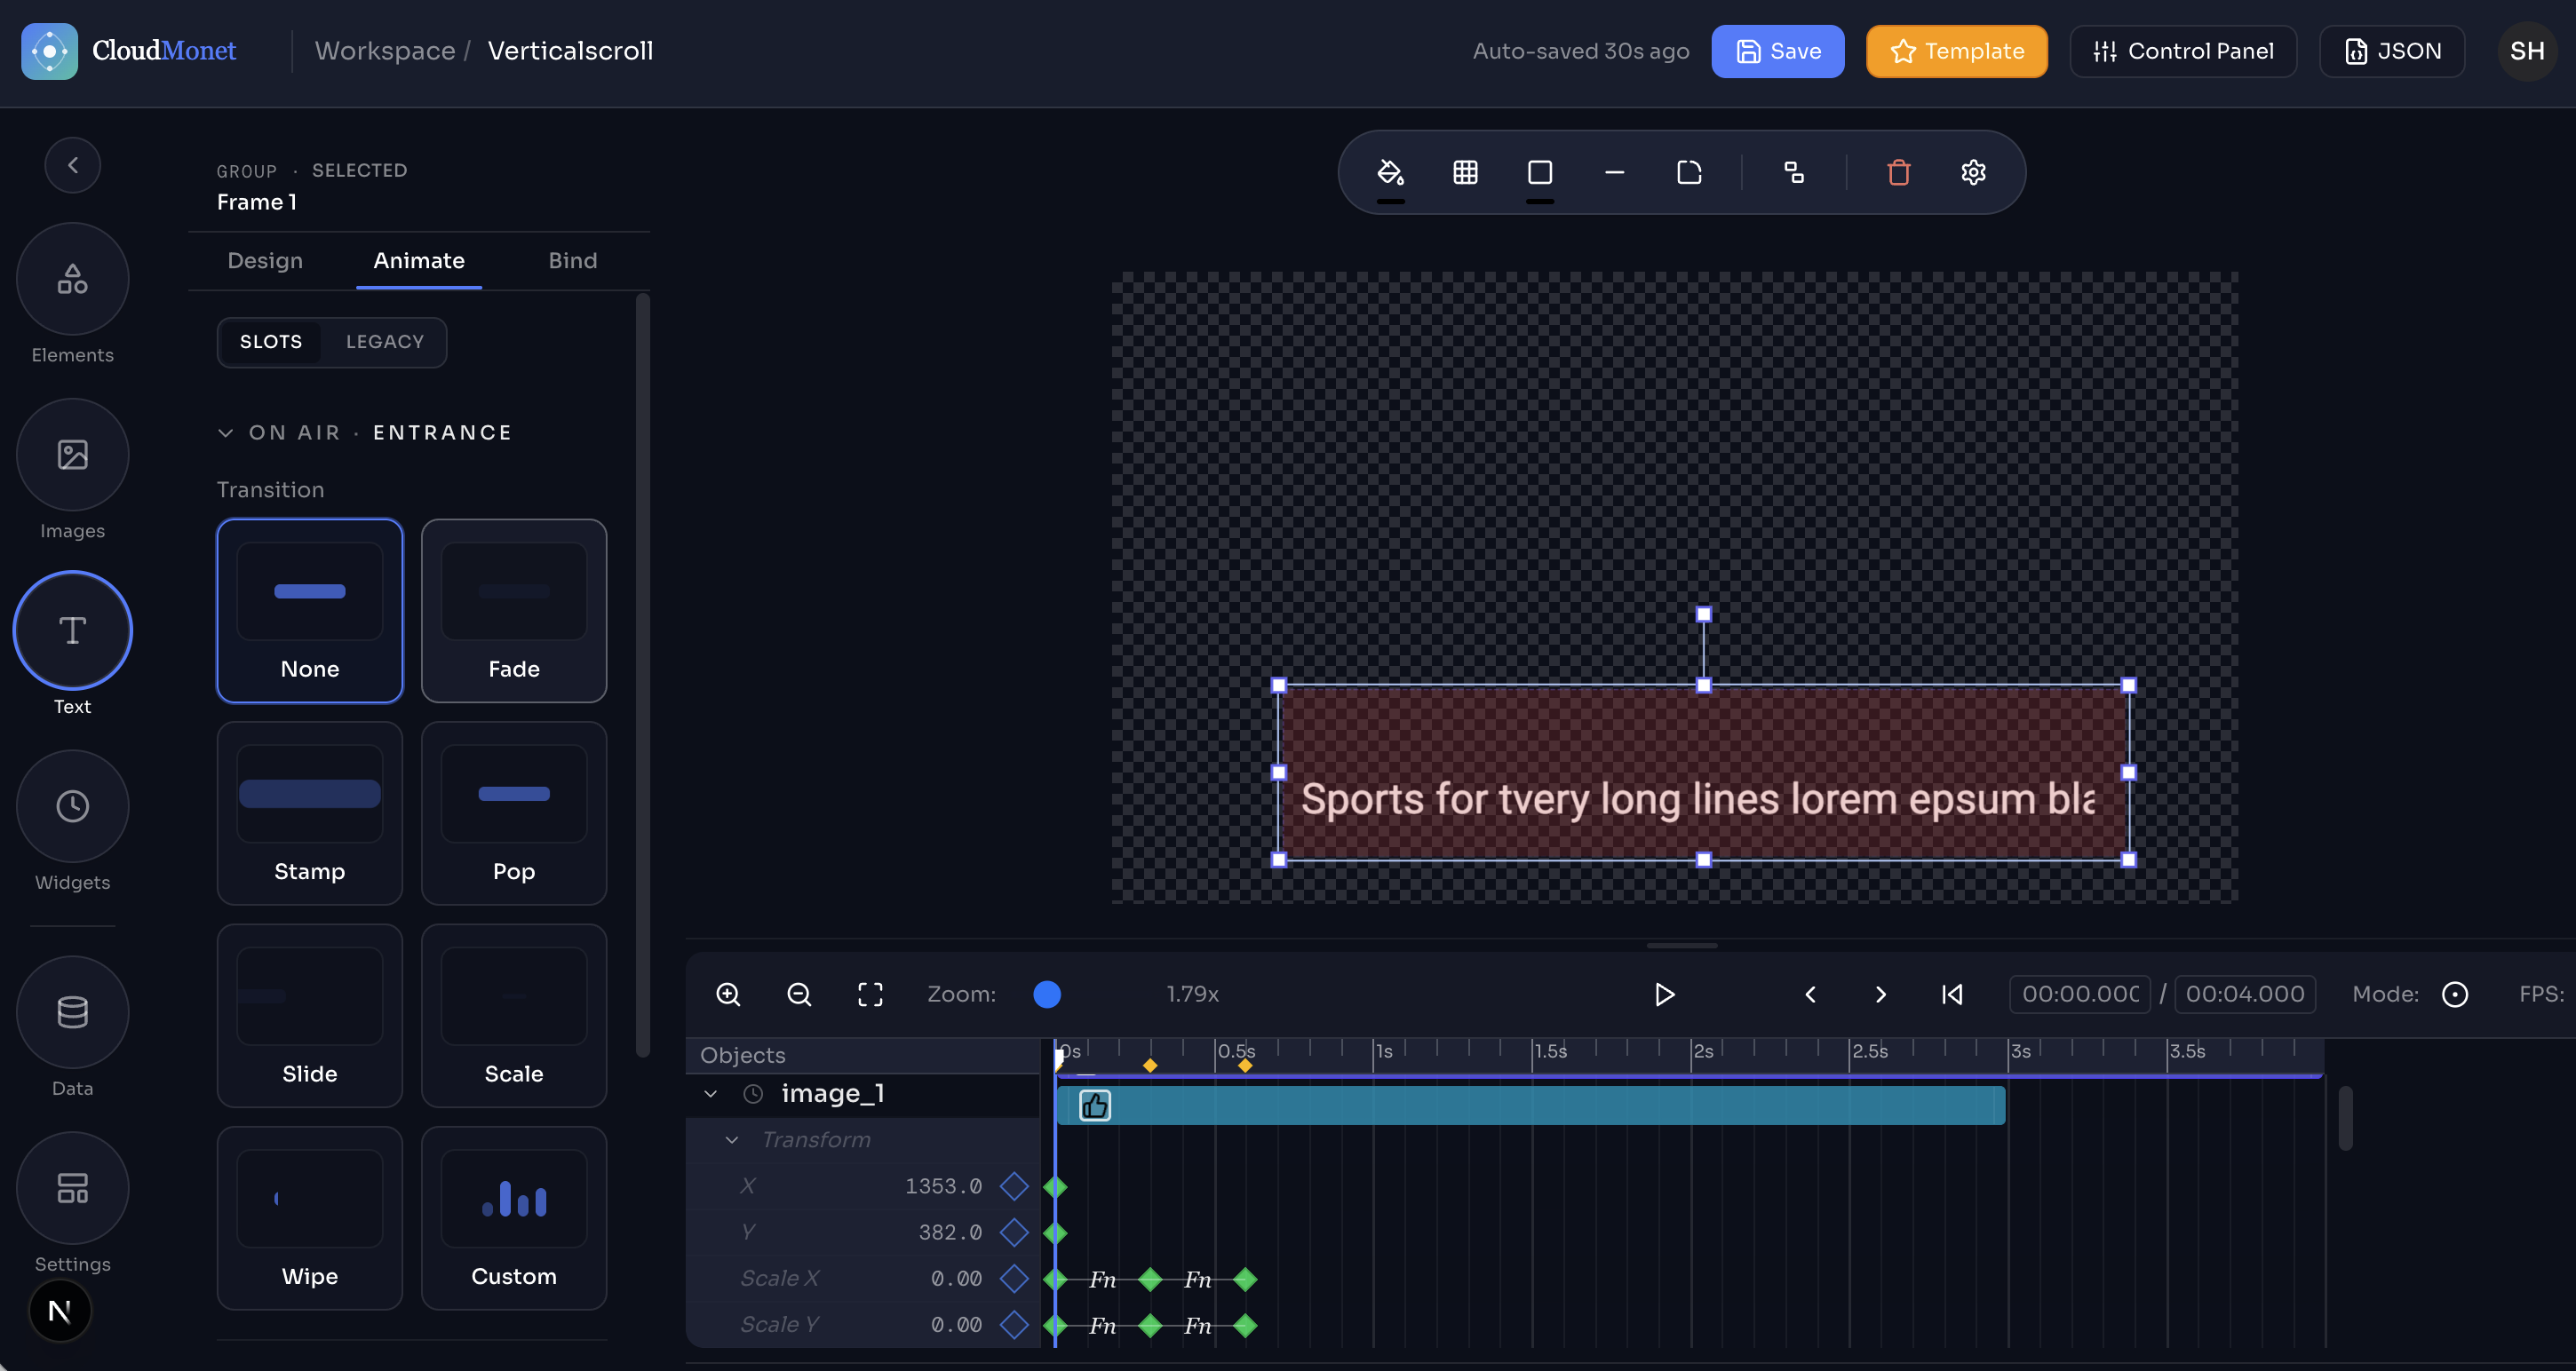
Notice the Fn labels on the keyframes in the timeline above. These indicate that a transition function is applied to that keyframe — in this case, the Slide transition preset. CloudMonet's transition presets (None, Fade, Stamp, Pop, Slide, Scale) are starting points that handle the animation for you. For full control over the easing curve, select Custom from the easing panel — that is where P1 and P2 come in.
To set the easing on a keyframe, select the element, go to the Animate tab, set your duration using the slider, and then choose an easing from the panel below.
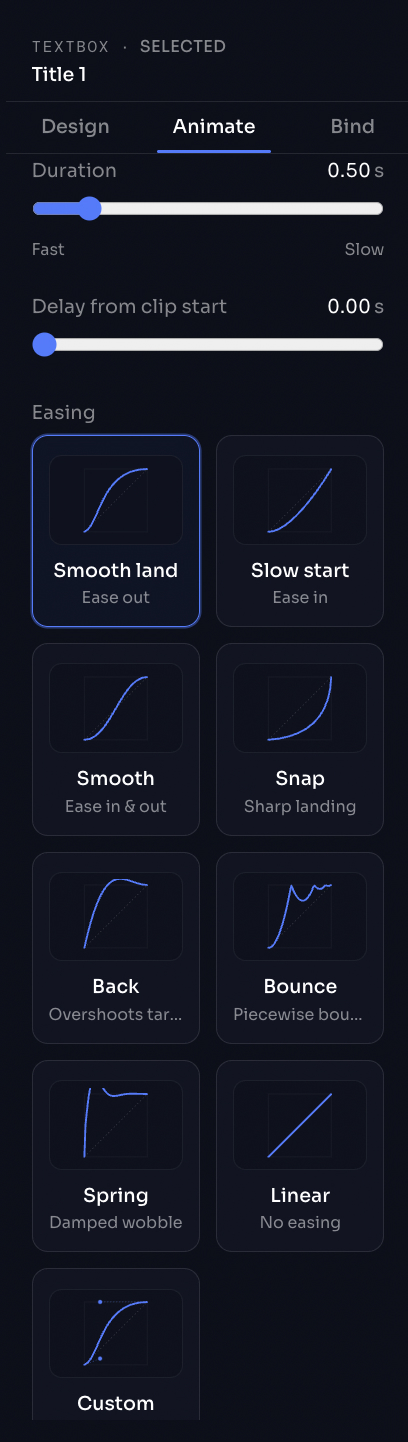
The eight named presets cover most production scenarios. For precise control — or when you want to match a specific animation feel — select Custom at the bottom of the panel.
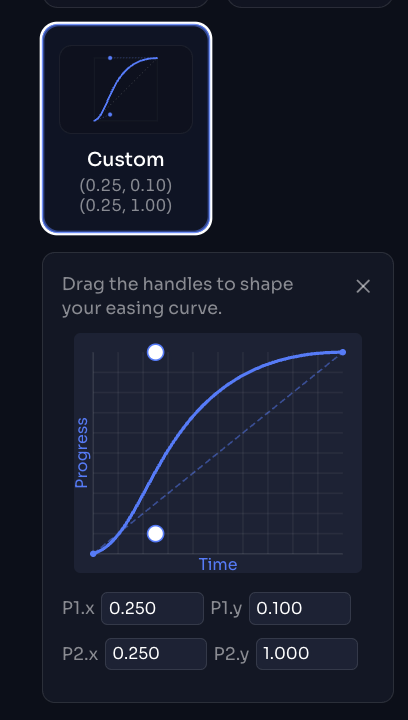
The custom editor shows the same Progress vs Time axes as the interactive sections below. The values shown on the Custom card — for example (0.25, 0.10) / (0.25, 1.00) — are exactly the P1 and P2 coordinates from the reference table at the end of this guide.
The Three Curves You Need
Most live graphics situations reduce to three animation scenarios: a graphic entering the frame (intro), a graphic leaving the frame (outro), and a graphic changing state while remaining on screen (transition). Each scenario has a different optimal curve — and getting the wrong one is immediately noticeable to trained eyes.
Each section below includes a live curve editor. Drag the red handle (P1) and the white handle (P2) — exactly as in CloudMonet's Custom editor — and hit Play to see the animation on a realistic production scene. The scene type matches the most common use case for each curve.
The Curves to Avoid
CloudMonet's easing panel includes Back, Bounce, and Spring. These are physically accurate curves — they simulate real-world motion with overshoot and oscillation. They are also inappropriate for almost every live production context.
The test is simple: if the animation calls attention to itself — if a viewer notices the motion rather than the content — the curve is wrong. The best live graphics easing is invisible. The content is what the viewer should remember.
Quick Reference — Easing Values
The P1 and P2 values below are ready to enter directly into CloudMonet's Custom bézier editor. The standard curves (Smooth Land, Slow Start, Smooth, Linear) are sourced from the W3C CSS Easing Functions specification and are mathematically identical across all tools that support cubic bézier easing. The Snap curve values follow the Material Design motion specification and are consistent with GSAP's power easing at equivalent settings. Custom (Gentle) is CloudMonet's recommended default for ambient graphics.
| CloudMonet Name | CSS Equivalent | P1 (x, y) | P2 (x, y) | Use for | Source |
|---|---|---|---|---|---|
| Smooth Land | ease-out | 0.00, 0.00 | 0.58, 1.00 | Intros, build-ins | CSS spec |
| Slow Start | ease-in | 0.42, 0.00 | 1.00, 1.00 | Outros, build-outs | CSS spec |
| Smooth | ease-in-out | 0.42, 0.00 | 0.58, 1.00 | Transitions, dissolves | CSS spec |
| Snap | cubic-bezier(0,0,0.2,1) | 0.00, 0.00 | 0.20, 1.00 | Breaking alerts, score flash | Material Design / GSAP |
| Custom (Gentle) | cubic-bezier(0.25,0.1,0.25,1) | 0.25, 0.10 | 0.25, 1.00 | Ambient, watermarks | CSS default ease |
| Linear | linear | 0.00, 0.00 | 1.00, 1.00 | Data counters only | CSS spec |
Duration — How Long Should Each Animation Take?
The easing curve shapes the animation; duration determines how that shape is experienced. The same Smooth Land curve feels fluid at 500ms and mechanical at 80ms. The table below covers standard duration ranges for common live production scenarios — both in frames (for broadcast operators working at frame rate) and in milliseconds (for streamers working in OBS, Streamlabs, or other browser-source environments where frame rate varies).
| Scenario | Frames @ 25fps (PAL) | Frames @ 30fps (NTSC) | Approx. Duration |
|---|---|---|---|
| Lower third build-in | 12–18f | 12–18f | 400–600ms |
| Lower third build-out | 8–12f | 8–12f | 267–400ms |
| Breaking news overlay | 6–10f | 6–10f | 200–333ms |
| Cross-dissolve / transition | 12–20f | 12–20f | 400–667ms |
| Score update flash | 4–8f highlight / 12–18f settle | 4–8f / 12–18f | 133–267ms / 400–600ms |
| Ambient lower third | 18–24f | 18–24f | 600–800ms |
| Stream overlay (OBS/Twitch) | — | 12–18f | 400–600ms |
In CloudMonet, duration is controlled in two places depending on how you're animating. For presets (Fade, Slide, Pop, Scale, etc.), use the Fast–Slow slider in the Animate tab — displayed in seconds, so 0.50s = 500ms. For custom animations, duration is defined by the distance between keyframes in the timeline view: drag a keyframe left or right to make the transition shorter or longer, and the easing curve you've set on that keyframe pair plays across the full interval.
For streaming productions — OBS, Streamlabs, web-based overlays — think in milliseconds rather than frames, since your output frame rate may vary. The millisecond column above gives you the target regardless of frame rate.
One rule that holds across broadcast and streaming: test on your actual output. A 500ms Smooth Land that looks perfect in CloudMonet's preview may feel different on a broadcast reference monitor, through OBS encoding, or on a stream with variable frame rate. Always preview on the signal your audience will see before going live.
The One Rule
Every easing decision in live graphics — broadcast or stream — comes back to the same principle: the animation should serve the content, not compete with it. A lower third that builds on with Smooth Land and settles cleanly communicates professionalism before the name is even read. A breaking news banner that snaps on with Snap communicates urgency before the headline registers.
The curve is invisible when it works. That is exactly the point. Use the interactive editors above to develop an intuition for each scenario — intro, transition, outro — and carry the reference table into your next production. Whether you are running a network broadcast or a solo Twitch stream, the same physics apply.